Image
This autumn, 75 years ago, Canadian and British forces liberated both shores of the Westerschelde, the waterway connecting the North Sea to the port of Antwerp. The victory, established after heavy fighting, opened up a critical supply route for the Allied Expeditionary Force for its offensive into Germany. In this article the author will focus on the operations in October and early November 1944, leading to opening the access route for Allied ships into the port of Antwerp.
Dick Zandee*
‘The story of the opening of the Scheldt is long and unpleasant.’[1]
In the late afternoon of 4 September 1944 British tanks drove into Antwerp, only a week after the Battle of Normandy had come to an end. Nevertheless, it would take another two months before Allied forces had captured the German heavy coastal batteries protecting the mouth of the Westerschelde.[2] Free access to this 60 kilometer long waterway connecting the port of Antwerp to the North Sea was essential for logistical supply of the Allied Expeditionary Force in view of its attack on Germany.
One cause of the delay was related to the military-strategic decisions taken in the month of September. The Westerschelde belonged to the 21st British Army Group’s area of responsibility. Its Commander, Field Marshal Bernard Law Montgomery, gave priority to Operation Market Garden and, even after its failure, directed most of the 21st Army Group’s fighting power to the East instead of to the West.[3] The other explanation is related to the conduct of the operations in order to capture both shores of the Westerschelde in October and early November. This article provides the key answers to the question of why the Allied forces needed five weeks of armed fighting before the last German forces surrendered on Walcheren. First, the broad outlines of the operations plan will be described. Consequently, the author analyses the operations with a specific focus on three distinct operations: in the Woensdrecht area (followed by the liberation of Zuid-Beveland), in the western part of Zeelandic Flanders and on the island of Walcheren. The different nature of the terrain in geographically distinct areas makes it necessary to treat these three operations separately, although they are part of the same Battle of the Westerschelde.[4] The fighting at battalion level and below is not addressed in detail. The final section provides the main conclusions on the key question of why it took more than a month of heavy fighting before the Westerschelde waterway was secured.
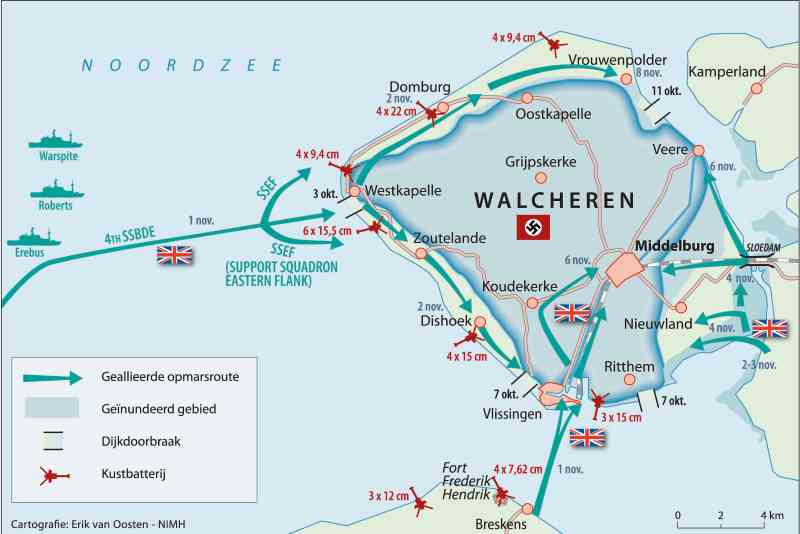
Map 1 Overview of the Battle of the Westerschelde, October-November 1944. Cartography: Erik van Oosten, NIMH
The operations plan
By mid-September the 1st Canadian Army took responsibility for the whole area from the coast to Antwerp after the 2nd British Army had been completely deployed to the east of the city for Operation Market Garden. The commander of the 1st Canadian Army, Lt-Gen. Harry Crerar, had already concluded that infantry divisions were needed to capture the mouth of the Westerschelde after a failed attempt to cross the Schipdonk and Leopold Canal near the village of Moerkerke on 13-14 September.[5] At the Headquarters of the 1st Canadian Army it was concluded that for the time being no further attempt would be made to attack across the Leopold Canal.[6] On 19 September Crerar informed his Corps Commanders that the 3rd Canadian Infantry Division would have to lead the attack, after it had completed its task to take the Channel ports of Boulogne and Calais which were still in German hands.[7] The campaign to open the Westerschelde waterway was delayed.[8] In the meantime the planning of the Battle of the Westerschelde was underway.

2nd Canadian Army Corps
2nd Canadian Infantry Division (until 20 October under command of 1st British Army Corps)
3rd Canadian Infantry Division
4th Canadian Armoured Division (until 17 Oct.)
52nd British (Lowland) Division (as of 18 Oct.)

1st British Army Corps
1st Polish Armoured Division
49th British (West Riding) Infantry Division
4th Canadian Armoured Division (as of 17 Oct.)
104th US (Timberwolves) Infantry Division (as of end Oct.)
Figure 1 Composition 1st Canadian Army, October 1944
The main problem for the planners at the 1st Canadian Army Headquarters was the shortage of infantry. The 2nd Canadian Army Corps, designated to lead the operations, had two infantry divisions at its disposal for the Westerschelde operations. The infantry capacity of these divisions was at approximately 50 percent. A lack of sufficiently trained infantry was often compensated by transferring soldiers from artillery and other combat support units to infantry battalions.[9] In western Zeelandic Flanders, Zuid-Beveland and Walcheren the many water obstacles and inundated polders forced the attacker to advance along dikes with little or no protection. Armoured vehicles could easily be hit from German defensive positions. Thus, an infantry attack was the only option to clear such strongholds, supported by air attack and artillery. Contrary to infantry, the Canadian Army had large amounts of artillery at its disposal. Each infantry division had three artillery regiments of 24 guns each. Furthermore, artillery of various calibres was available at higher command levels. A lack of infantry was often compensated by artillery – ‘brute force’ according to one historian[10] – in order to destroy or confuse the German forces, but also at the cost of civilian life and heavy damage to civilian property.
The original plan of the 1st Canadian Army Plans Section for the assault on the Westerschelde area foresaw in two lines of attack. The first would be carried out by the 2nd Canadian Infantry Division, advancing from Antwerp towards Bergen op Zoom with flank support by the 1st Polish Armoured Division. Following the capture of the entry point to Zuid-Beveland, the following line of attack would be westward toward Walcheren. Two airborne brigades would establish bridgeheads followed by the advancing infantry. The second line of attack would be to liberate western Zeelandic Flanders and capture the coastal batteries on the south shore of the Westerschelde mouth – the task of the 3rd Canadian Infantry Division. The 2nd Canadian Army Corps would direct the operations. Its commander, Lt-Gen. Guy Simonds, rejected the original plan. In his view two infantry divisions (with approximately 50 percent infantry capacity) would not be enough for a victory. Simonds argued for additional forces and a third line of attack, consisting of amphibious landings on Walcheren. This implied the involvement of the Royal Navy (R.N.) for a joint attack by army and naval forces. Crerar concurred. On 21 September Captain Anthony Pugsley R.N. was sent to the Headquarters of the 2nd Canadian Army Corps in Bruges to begin the planning of the naval operations and the coordination with the land operations.[11] More controversial was the proposal of Simonds to flood Walcheren by bombing the dike at Westkapelle at the most western point of the island. In Simonds’ view the inundation would force the enemy to concentrate its forces in the coastal dune areas, while logistical supply lines and reinforcements from the interior of the island to the coastal strongholds were to be hampered. The batteries would be attacked by bombers to reduce their capacity and defences. Flooding the island would offer the landing forces the opportunity to sail through the gap and attack the coastal batteries from inland. Crerar and the Royal Air Force Bomber Command turned against the proposal, but Simonds continued to argue in favour of his plan. On 26 September Crerar agreed, one day before he handed over the command of the 1st Canadian Army to Simonds.[12] As the flooding would impose a burden on the population of the island the bombing required the authority of the Supreme Commander. On 1 October Gen. Eisenhower approved the proposal. The Dutch government in exile was not consulted before the decision was taken.
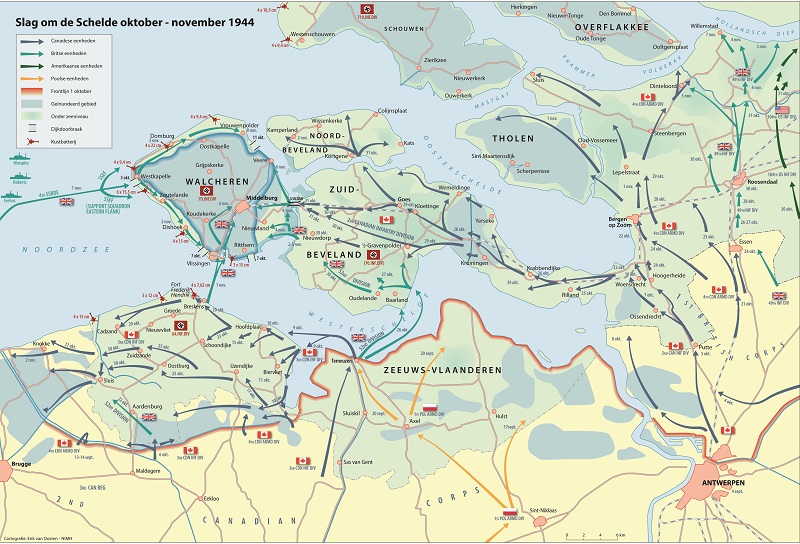
Nazi propaganda pictures showed the homefront how German troops continued operations in inundated terrain. Photo DPA/Picture Alliance
The final plan for capturing both shores of the Westerschelde fell short of what Simonds deemed necessary. Firstly, the request to use airborne forces was rejected by Lt-Gen. Lewis Brereton, commanding the 1st Allied Airborne Army. He considered airborne operations to be too risky due to the strong German air defence capability and the difficulty of the terrain, potentially leading to excessive losses by drowning. Secondly, bombers would be made available for the flooding of the island, but only to a limited amount for attacking the coastal batteries.[13] Thirdly, the 1st Polish Armoured Division could not be deployed to provide flank support to the 2nd Canadian Infantry Division in its attack on Bergen op Zoom. On 27 September Montgomery directed the 1st British Army Corps (including the 1st Polish Armoured Division) to thrust northeastwards on the Tilburg/’s-Hertogenbosch axis to reinforce the western flank of the 2nd British Army corridor towards Nijmegen, resulting from Operation Market Garden. The 4th Canadian Armoured Division was still needed south of the Westerschelde in support of the 3rd Canadian Infantry Division’s attack on the Breskens Pocket. Simonds was left with limited forces: without flank support the 2nd Canadian Infantry Division had to capture the entry point to the Zuid-Beveland isthmus near Woensdrecht on its own; the 3rd Canadian Infantry Division would have to clear the Breskens Pocket in western Zeelandic Flanders with the support of (the infantry of) the 4th Canadian Armoured Division; finally, Walcheren would be attacked from Zuid-Beveland and by amphibious landings. The orders to the divisional commanders were given by Simonds on 2 October, which can be regarded as the starting date of the operations to clear the Westerschelde area from German occupation.
The Battle of Woensdrecht
In 1944 one main road connected Antwerp to Bergen op Zoom, running from the north side of the Albert Canal at Merksem to the Belgian-Dutch border at Putte and from there over the high ground of the ‘Brabantse Wal’ further north.[14] West of this high ground the lower polder area had been inundated by the Germans. Just north of the villages of Hoogerheide and Woensdrecht, approximatly 6 kilometers south of Bergen of Zoom, the ‘Zeelandweg’ (Zeeland road) joined the Antwerp-Bergen op Zoom main road at the T-junction (see map 1). Capturing this junction and its surroundings was the first strategic objective of the 2nd Canadian Infantry Division: the entry point to Zuid-Beveland.

2nd Canadian Infantry Division
4th Canadian Infantry Brigade
5th Canadian Infantry Brigade
6th Canadian Infantry Brigade

3rd Canadian Infantry Division
7th Canadian Infantry Brigade
8th Canadian Infantry Brigade
9th Canadian Infantry Brigade

4th Canadian Armoured Division
4th Canadian Armoured Brigade
10th Canadian Infantry Brigade
Figure 2 Composition 2nd Canadian Army Corps, October 1944
In the early morning of 2 October the 4th Canadian Infantry Brigade started its offensive pushing north through Merksem.[15] German infantry troops in the area[16] delayed the advance but without severe losses the Canadians reached the centre of Hoogerheide on 7 October – three miles from the T-junction with the Zeeland road. As recorded in the official account of the Canadian campaign in Europe ‘the objective of the first phase seemed to be within our grasp.’[17] At the higher German command levels[18] the situation was regarded as very dangerous: counter-measures had to be taken. Immediately, the 6th Parachute Regiment (Fallschirmjäger Regiment 6) was transported from the Tilburg area to the front line south of Bergen op Zoom where it arrived in the course of 8 October.[19] The Canadians were now facing some additional 2,600 soldiers under the command of a very experienced officer, Oberst Friedrich August von der Heydte. The Canadian offensive came to a halt and three weeks of heavy fighting followed. From 8 to 10 October two Canadian battalions tried to break through the German defences in the centre of Hoogerheide – without success and at the loss of many soldiers. A second attempt was made on Friday 13 October when the Black Watch (Royal Highland Regiment) of Canada was ordered to attack the German defences behind the railway line from Bergen op Zoom to Vlissingen, west of Woensdrecht. Advancing over small dikes through inundated territory the Canadians suffered heavy losses.
The Germans were well positioned behind the dike on top of which the railway line was running. The failed attack resulted in ‘Black Friday’: the Black Watch lost 183 of the 296 military taking part in the operation (a 62 percent loss, the highest rate of all Canadian Army units during World War II).[20] Three days later the Royal Hamilton Light Infantry under the command of Lt-Col. Denis Whitaker was more successful. With heavy artillery support it managed to capture a large part of the village of Woensdrecht. Nevertheless, the high ground at the north side of the village – from where the Germans could still control the Zeeland road – remained in German hands for more than another week. On 24 October Canadian troops liberated the rest of the village and reached the T-junction with the Zeeland road. The Germans had withdrawn, facing the danger of encirclement by the advancing 4th Canadian Armoured Division and the other divisions of the British 1st Army Corps further east, finally providing the flank support which the 2nd Canadian Infantry Division had been lacking since the start of its offensive.[21] The division suffered over 400 fatalities.[22] Immediately it turned westward to Zuid-Beveland and towards Walcheren.
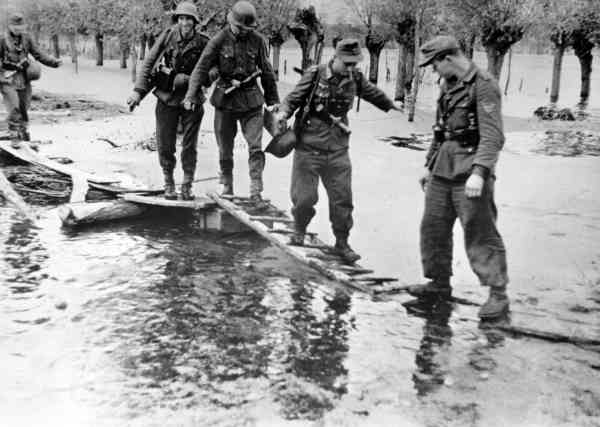
Breskens, which had already suffered from RAF bombings in September, finally fell in Allied hands on 21 October 1944. Photo Beeldbank NIMH
The Battle of the Breskens Pocket
On the south bank of the Westerschelde mouth the Germans had used the month of September to construct their defensive positions. The Breskens Pocket[23] was well protected by natural obstacles.[24] The pocket was defended by the 64th German Infantry Division under the command of Generalmajor Kurt Eberding. During the withdrawal of the 15th German Army across the Westerschelde this division had been ordered to stay behind in the area. Eberding had about 9,000 troops under his command, armed with almost 500 machine guns, a large number of mortars and artillery of calibres up to 150mm. Including air defence and Kriegsmarine (German Navy) personnel operating the two coastal batteries (at Breskens and Cadzand) Eberding as Fortress Commander had some 13,700 troops at his disposal.
The offensive was carried out by the 3rd Canadian Infantry Division, which had taken the German fortresses of Boulogne and Calais by 1 October. The plan of its commander, Maj-Gen. Dan Spry, was to attack from the south with two brigades and across the Braakman Inlet with one brigade. In the meantime, the 4th Canadian Armoured Division would keep the pressure on the German front near Isabellahaven, binding German defensive forces while at the same time trying to force a breakthrough. A large force of artillery would support the attack along the whole divisional front – a total of 327 guns of all calibres. The operation was given the name ‘Switchback’.
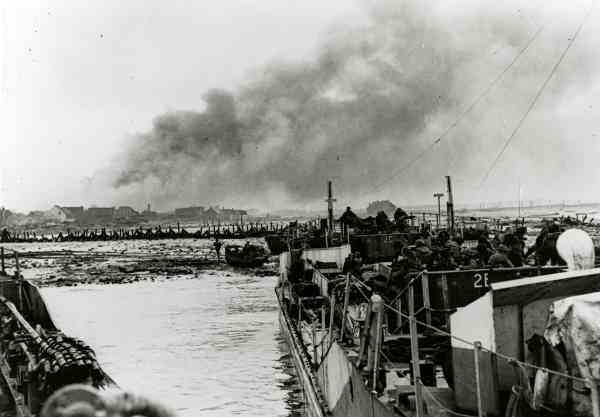
On 6 October two infantry battalions of the 7th Canadian Infantry Brigade started the offensive just east of the Maldegem-Aardenburg road, where the two canals were separated. The Germans had withdrawn behind the northern canal, located about 1 kilometer south of the border (see map 1). The polders on the Dutch side had been flooded. Two small bridgeheads were established, approximately 1.5 kilometers from each other. Soon, the Germans counter-attacked the bridgeheads, supported by artillery. Several days of heavy fighting made it clear that the Canadians were facing a strong defensive force.[25] On 9 October the gap between the two bridgeheads was closed. Three days later the border-crossing point of the road south of Eede was reached.
Due to the strong German opposition at the Leopold Canal the flank operation across the Braakman was given more importance. Carried across the Braakman by 96 Buffaloes[26] in the early hours of 9 October two infantry battalions of the 9th Canadian Infantry Brigade completely surprised the Germans. They managed to establish a bridgehead near Hoofdplaat and one closer to the Braakman. By the time the defenders started to shell the two battalions, reinforcements had already arrived. Both bridgeheads were firmly held by the Canadians. Taking into account the difficulties encountered at the Leopold Canal and the failed attempts by the infantery of the 4th Canadian Armoured Division to break through the German defences at Isabellahaven, the 8th Canadian Infantry Brigade was also ordered to cross the Braakman instead of following the 7th Canadian Infantry Brigade near Eede. The Braakman crossing of the 8th Canadian Infantry Brigade took place on 11 and 12 October. A few days later, the Germans, facing Canadian breakthroughs both in the southern area and on the eastern side of the Pocket, withdrew to a new defensive line, running from Sluis via Oostburg to Breskens. As of that moment, the Canadians could use the Isabellahaven entry point to reinforce and supply their forces in the eastern part of the Pocket.[27]
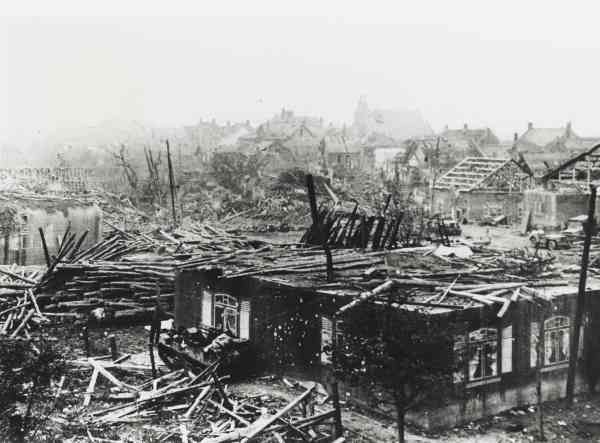
In inundated polders near the Leopold Canal, the Allies met strong German opposition. Photo DPA/Picture Alliance
About 3,000 German soldiers had been taken prisoner and many had died in the fighting. The situation became more and more desperate for the defenders, although they continued to fight in order to delay the Canadian advance. Breskens fell on 21 October. A few days later the German naval troops surrendered at the Fort Hendrik coastal battery, west of the village. On 2 November the German Navy’s commander of the battery at Cadzand did the same. The last German forces withdrew across the border back into Belgium (Knokke). In the morning of 3 November Spry declared Operation Switchback as having been completed.[28] It had taken four weeks of heavy fighting to capture an area approximately 35 kilometers wide and 10-20 kilometers deep. No other German Fortress held out for such a long time.[29] The 3rd Canadian Infantry Division lost 2,077 men (killed, wounded, missing).[30] The population in the Pocket suffered almost as many fatalities as the Allied forces: 735. The material damage was enormous: 27 percent of the buildings were destroyed and 36% were damaged, mainly due to air attacks and Canadian/British artillery.[31]
The Battle of Walcheren
After the breakthrough at Woensdrecht the 2nd Canadian Infantry Division immediately turned west to capture the Zuid-Beveland isthmus, known as the ‘Kreekrakdam’ in Dutch. From there they continued their advance of what was labelled ‘Operation Vitality’. In the meantime the 52nd British (Lowland) Division had arrived on the south bank of the Westerschelde, after Montgomery had given in to Eisenhower’s pressure to make more forces available for the opening of the waterway to Antwerp.[32] Now, the 2nd Canadian Army Corps could bring to the battlefield a third and well-trained infantry division. On 26-28 October two infantry brigades (the 156th and the 157th) of the 52nd (Lowland) Division crossed the Westerschelde, landing at the southern point of Zuid-Beveland near the village of Baarland. Facing a combined attack by the Canadian and British forces the Germans soon withdrew their remaining troops across the Sloedam to Walcheren. On 31 October the Canadians reached the eastern side of the Sloedam. Operation Vitality had taken about a week. With both the Breskens Pocket and Zuid-Beveland cleared from German occupation the final part of the campaign could start: taking Walcheren and its heavy coastal batteries.

52nd British (Lowland) Division
155th British Infantry Brigade
156th British Infantry Brigade
157th British Infantry Brigade

4th Special Services Brigade
4 (Army) Commando
41 (Royal Marine) Commando
47 (Royal Marine) Commando
48 (Royal Marine) Commando
10 (Interallied) Commando
Figure 3 Composition of British forces Walcheren, November 1944. Smaller tank, engineer and other units are not listed
Map 2 Overview of the Allied operations againt the Germans on the island of Walcheren. Cartography: Erik van Oosten, NIMH
Gen. Simonds’ plan for capturing the island of Walcheren consisted of three axes of attack: (i) the 5th Canadian Infantry Brigade and the two British (156th and 157th) Infantry Brigades would attack the island from the Zuid-Beveland peninsula; (ii) the 155th Infantry Brigade would take Vlissingen after commandos had established a bridgehead by crossing the Westerschelde with Breskens as the embarking point – Operation Infatuate I; (iii) marine commandos would land at the Westkapelle gap and capture the coastal batteries – Operation Infatuate II. Canadian artillery at Breskens would provide fire support when needed and, weather allowing, the Royal Air Force would provide air support. Thus, the operation would be a joint one – involving naval and land forces plus air support as required – and combined with the participation of Canadian and British troops (infantry and marine commandos).[33]
Operation Infatuate II: Near Westkapelle, troops of 79th Armoured Division and Royal Marine Commando’s of 41 RMC are headed for the coast. Photo Beeldbank NIMH
The island was defended by the remaining units of the 70th German Infantry Division. Contrary to the 64th Infantry Division in the Breskens Pocket this division had not participated in the fighting along the Channel Coast.[34] Before the end of September the division had already been reduced in size. One of the three infantry regiments, three artillery batteries and an engineer company were transferred to North Brabant to reinforce the German defences. Furthermore, some 2,500 troops had been taken prisoner during Operation Vitality. The two remaining infantry regiments consisted of two battalions each.[35] Generalleutnant Wilhelm Daser commanded the 70th Infantry Division from his headquarters in Middelburg, the capital city of the Province of Zeeland. On 5 September Walcheren was declared a Fortress (Festung Walcheren), making Daser commander of all German forces on the island. In reality, the German Army and Navy units at the coastal batteries operated separately. Daser was also lacking troops to reinforce the defence of the coastal batteries. When under attack, the military in the coastal strongholds had to act on their own and German Navy personnel were not trained in close combat (hand to hand). Furthermore, the inundation of Walcheren (see Box 1) made it impossible for the German Army to provide artillery support from the inland area to the beaches during landings.
BOX 1
The inundation of Walcheren
In the afternoon of 3 October eight attack formations of 247 Lancasters dropped 1,247 tons of bombs on Westkapelle, creating a gap in the dike of about 80 meters wide. During the bombardment 152 citizens died, of whom 44 were in the Theune Mill (Molen van Theune) and they drowned. The village lost 7 percent of its population.
Warnings by Dutch experts to Allied commanders that the island would not be flooded by bombing at Westkapelle were neglected. The effect was limited: at high tide water only reached a few kilometers inland. Nevertheless, the Germans started to evacuate their artillery units and left inland bunkers and other locations. On 7 October new bombing attacks were carried out west and east of Vlissingen. On 11 October Lancasters also dropped bombs near Veere on the northeastern side of the island, creating a fourth gap. Six days later a new attack at Westkapelle resulted in widening it to several hundred meters.
By late October some 70 to 80 percent of Walcheren was flooded. Thousands of citizens had left their houses and farms to find refuge in Middelburg and Vlissingen or in the villages on the northern side of the island near the wide dune areas. After the war it would take until February 1946 before all four gaps had been closed.
The Sloedam
A dam of about 1200 meters long and 40 meters wide connected Zuid-Beveland to Walcheren, crossing the Sloe Inlet. All of the trees had been felled and at about three quarters of the length of the dam the Germans had created a large crater filled with water, making the use of armoured vehicles impossible. On the Walcheren side a strong defensive position had been built, allowing the defenders to hit any place on the dam with machine-gun, mortar and artillery fire. Nevertheless, the Canadians attacked the dam without delay. On 31 October the Black Watch, which had suffered heavy losses at Woensdrecht, was ordered to lead the attack across ‘the Causeway’ (the Canadian name for the Sloedam). The troops met heavy German firing and had to withdraw early in the evening. The next wave of attacks was carried out by the Calgary Highlanders on 1 November. Although the opposite side of the dam was reached and 15 Germans were taken prisoner, the forward company was forced to withdraw after a German counter-attack. Early next day, on 2 November, the third battalion of the 5th Canadian Infantry Brigade – belonging to the Régiment de Maisonneuves – established two small bridgeheads with two platoons (in total some 30 military including six Belgian soldiers).[36] They dug in – one platoon in a farm house, the other platoon in a tunnel under the railroad – and were unable to move any further, remaining constantly under German fire.
The Scots of the 157th Infantry Brigade were supposed to relieve the Canadians in the early morning of 2 November and to continue the attack. From that moment the Canadian 2nd Infantry Division would no longer be involved in the fighting. The command of the land forces for the remainder of the Walcheren operation was handed from Gen. Foulkes (commander of the 2nd Canadian Army Corps) to Maj.Gen. Edmund Hakewill-Smith, commander of the 52nd British (Lowland) Division. However, on 1 November Foulkes and Hakewill-Smith had clashed over the course of the operation. Hakewill-Smith was of the opinion that continuing the attack across the Sloedam would only cost more lives. Foulkes reacted furiously and threatened to relieve Hakewill-Smith of his command if the Scots did not carry out a full-blown attack across the dam within the next 48 hours. This provided Hakewill-Smith with a two-day period to find an alternative. Based on aerial photography and informed by local people an appropriate place was found to cross the Sloe Inlet, approximately three kilometers south of the Sloedam (see map 2). After a reconnaissance party had confirmed that the Walcheren side could be reached by boat and by walking through the sandbars and salt marshes, the crossing started in the night of 3 November (Operation Mallard). The 6th Battalion The Cameronians surprised the Germans and established two bridgeheads. Reinforced by other battalions of the 156th Infantry Brigade the Scots pushed the German defenders further inland. On 4 November they met with their fellow soldiers of the 6th Battalion Glasgow Highlanders of the 157th Infantry Brigade who had relieved the Canadians at the Walcheren side of the Sloedam. In the following days both brigades would clear the rest of the area east of the Walcheren Canal. One battalion would meet up with the small British contingent that had reached Middelburg on 6 November, coming from Vlissingen. The total Canadian losses at the Sloedam amounted to 149 (of which 35 were fatal); the Scots had a comparable number of casualties.[37]
Vlissingen
For centuries Vlissingen had protected the gate to Antwerp. The Germans, very aware of its strategic importance, had reinforced the city’s defences (Verteidigungsbereich Vlissingen): by placing several sorts of obstacles on the beach in front of the boulevard; by building bunkers, pill-boxes and other defensive strongholds; and, on the landside, by constructing an anti-tank wall and a small canal with a series of bunkers for firing at enemy forces approaching from the inland. The landside defence line had largely become useless due to the inundation of the island. One battalion of the 1019th Grenadier Regiment plus divisional troops had to defend Vlissingen – not a formidable force but able to resist an enemy attack from its reinforced defensive positions.
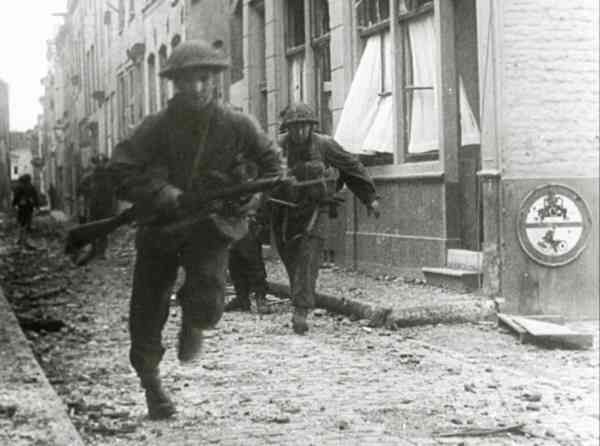
Due to fierce German resistance, it took the Allies over 48 hours to capture the city of Vlissingen and its harbour area. Photo Imperial War Museums
Using the dark of the night and approaching Vlissingen as silently as possible No. 4 (Army) Commando – part of the British 4th Special Services Brigade – landed at ‘Uncle Beach’ at around 05.45 hours on 1 November.[38] The area, to the east of the city’s boulevard, had been chosen as the best landing zone on the recommendation of a Dutch police inspector, who had escaped Vlissingen a few days before. The initial landings unrolled successfully, completely surprising the German defenders near Uncle Beach who were quickly overrun. Successive waves of No. 4 Commando Troops[39] went ashore despite German firing at the landing zone. The commandos entered the city, advancing through the centre. At its western side they had to halt their advance after arriving at the strategically located square codenamed Bexhill.[40] The Germans held the square under fire from a bunker at the landside of the boulevard. In the meantime the first of the three battalions of the 155th Infantry Brigade went ashore in the early daylight to support the No. 4 Commando Troops and capture other parts of the city. Soon, the 4th Battalion The King’s Own Scottish Borderers was also bogged down at Bexhill (named ‘Hellfire Corner’ by the Scots). It took until the early morning of 2 November before the Germans in the bunker on the boulevard surrendered after French commandos had finally reached the front door. On the same day the 5th Battalion The King’s Own Scottish Borderers started to capture the northern quarters and the harbour area with its docks. The 7/9th Battalion The Royal Scots were given the task of clearing the remaining part of the city including the German stronghold at Hotel Britannia, almost at the western end of the boulevard. To reach the landside of the hotel the Royal Scots had to walk through a flooded part of the city with the water reaching shoulder height. They captured Hotel Britannia in the early morning of 3 November. After opening the door of an undergound bunker they discovered the Headquarters of the 1019th Grenadier Regiment. Its Commander, Oberst Eugen Reinhardt, surrendered together with 130 soldiers. The fighting in Vlissingen had come to an end. Although it had taken over 48 hours to capture the city and its harbour area, the Allies had a limited number of fatal casualties (69). Approximately 600 Germans had been taken prisoner. The damage to housing – mainly caused by air bombardments and artillery fire – was enormous: 1,353 houses were destroyed; 5,246 damaged; only one house had no damage.[41]
Westkapelle and the coastal batteries
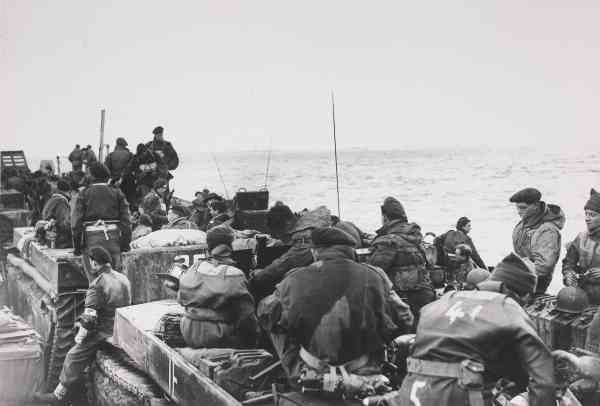
The Naval Force ‘T’, commanded by Captain Pugsley, consisted of three elements: the Bombardment Squadron with one battleship and two monitors – all three of them equipped with 15 inch guns capable of destroying the coastal batteries; two Support Squadrons with a total of 28 ships with various sorts of weaponry for attacking the enemy at close range; and landing craft to bring three Commandos of Royal Marines (plus Norwegian, Belgian and Dutch marines) ashore – all belonging to the 4th Special Services Brigade under the command of Brig. Bernard Leicester RM (nickname ‘Jumbo’). A few minutes after 08:00 hours on 1 November the Bombardment Squadron started to shell the coastal batteries. The effect was nil with the exception of two 3.7 inch guns at battery W15, just north of Westkapelle, which were silenced by hits from HMS Roberts. From the landings at the Normandy coast the Royal Navy had learned that the Germans fired at random at whatever enemy vessel came within their range. This knowledge was applied to the plan of attack: the two Support Squadrons were sent ahead of the landing craft. While the Germans concentrated their firing on the Support Squadrons, north and south of the gap in the dike, two Royal Marine (RM) Commandos landed near the gap. The plan worked as foreseen, but at great losses for the Support Squadrons: of the 28 ships only seven could continue their operations without serious damage; 172 men lost their lives and 125 were wounded (29 percent of the total of 1,030 personnel).[42] At 10.00 hours 41 (RM) Commando landed relatively unhindered at the north side of the gap, followed by 48 (RM) Commando at the south side. In the latter case, the beach-head was established with the lucky circumstance of battery W13, southeast of Westkapelle, running out of munition at 10:17 hours. Later in the day 47 (RM) Commando landed, but it took until the evening before all Troops had been assembled in the same area due to the changing tide which resulted in landing craft hitting the shores at different places.[43]
With the landings succesfully conducted the marines advanced as quickly as possible to capture the coastal batteries: W15 was overrun just after midday by British and Norwegian marines, but the first attempt to take W13 failed. After artillery and air support had been delivered 48 (RM) Commando succeeded in capturing the battery by late afternoon. In the end the unit had lost 26 percent of its manpower, including 12 fatal losses.[44] On the next day, 2 November, priority was given to clear the rest of the dunes in the direction of Vlissingen in order take the last heavy coastal battery at Dishoek (W11) out of action. 47 (RM) Commando, carrying out the attack, experienced comparable difficulties in capturing the battery area as 48 (RM) Commando had done the day before.[45] It was only in the course of the morning of 3 November that W11 was silenced. The northern side of Walcheren island (Domburg to Vrouwenpolder) was cleared in the following days by 41 (RM) Commando and Norwegian and Belgian Troops belonging to 10 (Interallied) Commando.[46]
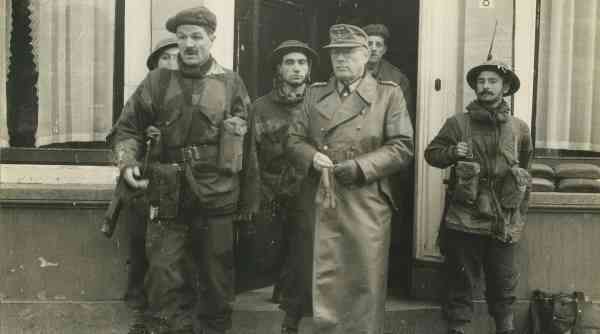
In Middelburg on 6 November 1944 Generalleutnant Wilhelm Daser surrendered his remaining troops. Photo Beeldbank NIMH
After Operations Infatuate I and II had been succesfully conducted the remaining challenge was to capture Middelburg and to demand that Lt-Gen. Daser surrendered his remaining troops. This happened on 6 November after a small detachment of the 155th Infantry Brigade had reached the city, coming from Vlissingen. Although fighting in remaining areas in the northern part of Walcheren continued until 8 November, the German capitulation on 6 November in Middelburg is considered as the end date of the Battle of the Westerschelde. In the following three weeks the Royal Navy cleared 270 mines in the waterway. On 26 November the first three coasters docked at the port of Antwerp. Two days later a first Allied convoy of 18 ships reached the port. On the same day, 28 November, an official welcoming party was organised attended by the Commanders-in-Chief of the Belgian, British and American Navy and Air Force, by Admiral Ramsay and by the local authorities of the city of Antwerp. The Canadian 1st Army had not received an invitation and, thus, was not represented at the ceremony.
Conclusion
With the opening of the Westerschelde the 1st Canadian Army had paid a high price for a crucial campaign in the Allied advance to defeat Germany. It lost 12,873 men (killed, wounded and missing), of which 3,650 were from the 2nd Canadian Infantry Division.[47] It is no surprise that one of the survivors called it ‘the longest and bloodiest battle’ the Canadians had fought from D-Day until the end of the war.[48] The exact number of fatal casualties is still unclear today. A deduction from various sources results in the following number of military fatalities: 1,825 Allied and 2,015 German. In addition, 1,440 citizens lost their lives during the campaign.[49] In particular air bombardments and artillery fire had caused tremendous damage: in Zeelandic Flanders 35 percent of the buildings had been destroyed; on the island of Walcheren 13 percent while 44 percent of the houses were under water. Agriculture suffered heavily: the 1945 harvest was 57 percent down compared to 1943.[50]
Why did it take five weeks of heavy fighting before the guns were silenced and the Westerschelde could be cleared from mines to open the estuary for Allied shipping towards the port of Antwerp? There are many reasons but perhaps the most imporant ones are the following.
Firstly, the lack of sufficient numbers of well-trained infantry. The topography of the area, in particular of the Breskens Pocket, Zuid-Beveland and the inundated Walcheren left the Canadian commanders with no other choice than an infantry attack. Lt-Gen. Simonds was of the opinion that at least three infantry divisions were required to capture both shores of the Westerschelde. He had to start with two Canadian infantry divisions, whose infantry battalions were at approximately 50 percent manpower strength and sometimes even one third, increasingly lacking experienced officers and soldiers. Air attacks and artillery fire were mostly needed to force breakthroughs, but at Woensdrecht, at the Leopold Canal and at the Sloedam the Germans were able to delay the advance for a considerable time despite heavy fire support for the Canadian infantry.
Secondly, the Germans used the terrain with the optimum effect, forcing the Canadians to attack along single roads or narrow passages from which they could keep the attackers constantly under fire. In Hoogerheide and Woensdrecht it resulted in street-fighting or advancing over small dikes in inundated territory with dramatic consequences for the attacking Canadian troops such as on Black Friday. The Germans also reacted quickly when breakthroughs were at hand, as shown by sending the 6th Parachute Regiment to the Woensdrecht front to block the Canadian advance.
Thirdly, and contrary to the German flexible responsiveness in their defences, the Canadians almost stubbornly tried several times to advance along almost impossible lines of attack. The Black Watch Regiment’s ‘fight that could not be won’[51] on 13 October and the three days of attempting to cross the Sloedam – considered a suicide mission by the British commanders – are tragic proof of persistent decisions taken by Canadian commanders against all odds. The flank operation across the Braakman changed the situation in the Breskens Pocket to the advantage of the attackers, but it was only after its start and in response to the slow progress made at the Leopold Canal that the 3rd Infantry Division’s leadership recognised its strategic importance.
Fourthly, only in the second half of October did a much needed third infantry division – the 52nd British (Lowland) Division – become available to the 2nd Canadian Army Corps. It played an important role in the last and most crucial phase of the operations – the capture of Walcheren. In the Woensdrecht area the final breakthrough could not be realised by the 2nd Canadian Infantry Division, after three weeks of fighting, severe manpower losses and a lack of infantry forces. Montgomery’s final acceptance of Eisenhower’s directive to give absolute priority to open the Westerschelde resulted in the flank attack by the 4th Canadian Armoured Division (under command of the 1st British Army Corps) towards Bergen op Zoom, forcing the Germans to withdraw in a northern direction.
A landing vessel with British commando’s of 47 RMC and a Dutch unit approaches Westkapelle, 1 November 1944. Photo Beeldbank NIMH
At the end, the tide turned to the advantage of the Allies. The Germans were left with insufficient infantry forces to withstand the attackers, in particular as well-trained British infantry, commandos and marines were brought into battle. From a purely military point of view the flooding of Walcheren – tragic as it was for the civilian population – contributed to the short duration of the fighting. The Germans could no longer use the inland bunkers and artillery to cover the beaches. At Westkapelle, coastal battery W13 was running out of ammunition almost at the moment the marines went ashore.[52] The plan of attack – with the lessons learned from the Normandy landings – was deliberately designed to allow the Germans to use the batteries for attacking the Support Squadrons instead of the landing craft, albeit with dramatic consequences for the support ships and their crews. Furthermore, the early days of November showed that joint and combined operations can bring quick success if they are planned well in advance and conducted with well-trained forces equipped with the necessary weaponry.
The port of Antwerp could be used by Allied ships from the end of November onwards, but this was too late for supplying the Allied Expeditionary Force for its all-out attack on Germany. Mid-December the German Army launched its last offensive operation in the Ardennes in order to recapture Antwerp and split the Allied forces. The operation failed but once more it was proof of the German belief in the strategic importance of the port at the far end of the Westerschelde. By attacking Antwerp with V1 ‘flying bombs’ and V2 missiles the German High Command still tried to disrupt the use of the port. It would cause the deaths of approximately 2,500 citizens[53] in the city, but had little or no disruptive effect on the flow of supplies. In February 1945 Antwerp and Ghent together handled 543,161 tons (31.3 percent of all supplies that landed in Europe). By April it had risen to 905,780 tons (44.7 percent of total supplies).[54] Allied use of the largest liberated port in Western Europe turned out to be essential for defeating Germany, but it had come late and at a high cost in the autumn of 1944.
* Dick Zandee is a historian with a special interest in World War II. The author is grateful to Christ Klep and Lt-col. (Ret.) Wouter Hagemeijer for their valuable comments on the text. Part 1 of this article series was published in Militaire Spectator 188 (2019) (10), pp. 468-481.
[1] Charles Perry Stacey, The Victory Campaign. The Operations in North-West Europe 1944-1945 (Volume III) (Published by Authority of the Minister of National Defence, Canada, 1960) p. 357.
[2] Western Scheldt. Canadian and British literature refer to ‘The Battle of the Scheldt’, named after the river running through Belgium towards Antwerp. After entering Dutch territory, north of Antwerp, the river turns into an estuary that is 3-5 km wide and has the name Westerschelde in the Dutch language.
[3] See: Dick Zandee, ‘The Battle of the Westerschelde-1944. Part 1: The impact of military-strategic decision-making’, in Militaire Spectator 188 (2019) (10) 468-481. The printed version contains two factual errors on page 477: 2nd British Army Corps should read 1st British Army Corps; 1st Canadian Infantry Division should read 2nd Canadian Infantry Division.
[4] In fact, there was no single ‘Battle of the Westerschelde’, but various battles constituting together ‘the campaign’ or ‘the operations’ to capture the Westerschelde shores. The term ‘Battle of the Westerschelde’ is used throughout this article as it is the most common way of describing the operations.
[5] The attack was carried out by soldiers of the Algonquin Regiment, belonging to the 4th Canadian Armoured Division which occupied the Bruges-Ghent area. After German counter-attacks the Algonquins had to withdraw after approximately 24 hours to the south bank of the double canal at the cost of 148 casualties. In the Canadian Army battalions were named after their parent (administrative) regiment. In most cases these regiments were named after their places or provinces of origin. A Canadian regiment consisted of several battalions. Even when only one of them was deployed, the name of the regiment would be used.
[6] Stacey, The Victory Campaign, p. 363.
[7] Although Montgomery signalled to Crerar from mid-September onwards that the opening of the Westerschelde had become a priority, he still insisted that at least Boulogne had to be captured in order to have Channel port capacity available for bringing logistical supplies to the Continent. On 26 October the cross-Channel fuel pipeline from Dungeness to Boulogne started to operate, but this was too late for an all-out offensive into Germany in 1944. See: Stacey, The Victory Campaign, p. 356.
[8] The only exception was the operation carried out by the 1st Polish Armoured Division to capture the eastern part of Zeelandic Flanders (16-21 September, see map 1).
[9] Canada had conscript service, but limited to Home Defence. Deployment overseas was strictly on a voluntary basis. The standard size of a Canadian infantry battalion in World War II was 816 military. During the Battle of the Westerschelde the number of companies per battalion was three instead of four and the average strength of an infantry battalion was 400-500 military. Infantry divisions had nine instead of twelve infantry battalions in total.
[10] John Ellis, Brute force. Allied strategy and tactics in the Second World War (New York, Viking, 1990).
[11] Pugsley had commanded the naval forces supporting the operations of the 1st Canadian Army to capture the Channel ports. His appointment was the choice of Admiral Sir Bertram Ramsey, Allied Naval Commander Expeditionary Force. Ramsay had been arguing for giving priority to operations to open the Westerschelde waterway from the moment the British had liberated Antwerp and had clashed over the matter with Montgomery.
[12] For some time Crerar suffered from persistent dysentry and had to return to the United Kingdom for medical treatment. Major-General Charles Foulkes temporarily took over command of the 2nd Canadian Army Corps, while Brigadier Ralph Holley Keefler replaced Foulkes as commander of the 2nd Canadian Infantry Division.
[13] This was partly caused by bad weather, but also the reluctance of senior officers at Bomber Command played a role. Their priority was to bomb industrial and other targets in Germany which was considered the most rewarding role for strategic air forces. None of the Allied air attacks on the German batteries at Walcheren in October was of the scale of bombardments in support of the Canadian Army during the Normandy campaign or the operations against the Channel ports. See: Stacey, The Victory Campaign, p. 377.
[14] Now the N289 (on Dutch territory)/N11 (on Belgian territory). Today, the A4 provides a motorway connection, running further west through the expanded Antwerp port area. The Brabantse Wal is an elevated area of several kilometers wide, starting at the border and ending north of Bergen of Zoom. Even more so than today the Brabantse Wal was covered with forested areas. Furthermore, German minefields forced the attackers to use the main road plus the connecting roads.
[15] A week earlier the 5th and 6th Infantry Brigades had started their offensive, crossing the Antwerp-Turnhout Canal to the east of the road to Bergen op Zoom, in order to cover the right flank of the 2nd Canadian Infantry Division’s area of responsibility. The main road and railway line from Roosendaal to Antwerp ran through this area (see map 1).
[16] The area north of Antwerp was defended by the 346th German Infantry Division. The division was reduced to a strength of approximately 8,000 military.
[17] Stacey, The Victory Campaign, p. 381.
[18] Oberkommando West (High Command West) under the command of Generalfeldmarschhall Gerd Von Rundstedt, Heeresgruppe B (Army Group B) under the command of Generalfeldmarschhall Walter Model – nickname ‘Abwehrlöwe’ (Defence Lion) due to his reputation of delaying defensive operations – and General der Infanterie Gustav von Zangen, commander of the 15th German Army and responsible for all German forces opposing the 21st British Army Group.
[19] The 6th Parachute Regiment was known as one of the best regiments of the 1st Parachute Army. In October 1944 it belonged to a temporary formation called the Kampfgruppe Chill, named after its commander Generalleutnant Kurt Chill. The Germans used these ad hoc composed ‘fighting groups’ as flexible and tailor-made formations to oppose attacking forces. They acted as ‘fire brigades’ to stop Allied breakthroughs.
[20] Casualty data from the Black Watch Regiment recordings, quoted in: J. van Doorn, J.S. Bos and M.A.J. Cillessen, Slag om Woensdrecht. Bevrijding van de Zuidwesthoek, oktober 1944 (Sommelsdijk, Stichting Historisch Onderzoek Tweede Wereldoorlog, oktober 1995).
[21] This flank support was the result of Montgomery’s acceptance to redirect the 1st British Army Corps to capture the western part of the North Brabant province after the so-called ‘Generals crisis’. See: Dick Zandee, ‘The Battle of the Westerschelde 1944 – part 1’, in: Militaire Spectator 188 (2019) (10) 468-481. The 4th Canadian Armoured Division had arrived in the area north-east of Antwerp on 18 October, after the breakthrough had been realised at the Breskens Pocket.
[22] Based on detailed data, listed in J. van Doorn e.a., Slag om Woensdrecht.
[23] The Canadian name of the area. The German name was Festung Schelde-Süd (the South Scheldt Fortress), after Hitler had ordered to turn the area into a Festung as of 20 September (before that date it was known as the Brückenkopf Breskens – the Breskens bridgehead).
[24] At the south side of the Pocket the Schipdonk and Leopold Canals (two canals running parallel to each other) offered the defenders excellent potential for blocking enemy attacks, while the Braakman Inlet on the eastern side provided another natural obstacle. As the Germans had inundated many polders they more or less forced the Canadians to concentrate the attack on the north-south Maldegem-Aardenburg road and the east-west road at Isabellahaven at the most southern point of the Braakman. German defences were concentrated at these two access points (see map 1).
[25] The diary of one of the regiments refers to ‘some of the fiercest fighting since D-Day’. See: Stacey, The Victory Campaign, p. 395.
[26] The Buffalo or Landing Vehicle Tracked (LVT) was an amphibious infantry vehicle with a (limited) driving capacity ashore. One vehicle could carry a maximum of 30 infantry soldiers.
[27] Furthermore, it allowed for the transfer of the 4th Canadian Armoured Division to the area east of Antwerp to provide the necessary flank support to the 2nd Canadian Infantry Division which was still fighting the Battle of Woensdrecht.
[28] Sporadic fighting, both on Dutch as well as on Belgian territory, continued for a few more days until all remaining German forces had been taken prisoner.
[29] In the case of an attack. Several fortresses such as Dunkirk remained in German hands until the German capitulation in May 1945, but they were only surrounded by Allied forces.
[30] Stacey, The Victory Campaign, p. 400.
[31] The reason why the Canadian troops were not immediately heralded as liberators when entering the destroyed villages. See for example: Gijs van der Ham, Zeeland 1940-1945 – Deel 2 (Zwolle, Waanders Uitgevers, 1989); Hans Sakkers, Enigma en de strijd om de Westerschelde. Het falen van de geallieerde opmars in september 1944 (Soesterberg, Uitgeverij Aspekt, 2011). Data from: Tobias van Gent and Hans Sakkers, Slag om de Schelde. De beslissing in de strijd om Europa (Bergschenhoek, Marberg Media, 2019) p. 311.
[32] The 52nd (Lowland) Division belonged to the 1st Allied Airborne Army in order to be flown in and reinforce airborne forces after they had established a strong bridgehead. The Scottish troops of this Division were particularly trained in mountainous operations.
[33] French, Belgian, Norwegian and Dutch commandos or marine commandos also took part in the operations. They were integrated in the British landing forces.
[34] It was known as the Magenkranken- or Weissbrotdivision (Stomach-ache or White Bread Division): since May 1944 it served as the unit to assemble German soldiers suffering from stomach problems and they were forced to eat white bread.
[35] The 1019th Grenadier Regiment defended Vlissingen and the area east of the Walcheren Canal while the 1020th Grenadier Regiment was responsible for the defence of the northern part of the island. One artillery regiment and several divisional battalions completed the list of available units. The Grenadier Regiments were not at full strength; e.g. the 1019th Grenadier Regiment at Vlissingen had less than 50 percent of its full manpower strength.
[36] The Canadian Army had welcomed Belgian volunteers in order to compensate for manpower shortages. The battalion of the Régiment des Maisonneuves was at one third of its full strength when attacking the Sloedam.
[37] Data mentioned in a very detailed account of the fighting at the Sloedam: R.E. Hoebeke, Slagveld Sloedam (Nieuw- en Sintjoosland, 2002).
[38] The 4th Special Services Brigade had units, called Commandos, consisting of naval (marines) or army personnel. A Commando was comparable to an infantry battalion but had half its size – an average strength of 400-450 military. In today’s force structures, the Commandos would belong to the Special Forces.
[39] A Commando Troop is comparable to an Infantry Company but had a maximum strength of 65 military. During the Walcheren invasion the Troops had a strength of 50-55 military each.
[40] To avoid confusion when using the Dutch street names all quarters and strategic objectives had been given English names. The Dutch name for Bexhill was (and still is) Betje Wolffplein.
[41] Data provided by the Vlisisngen city archives. Houses under water are included. https://www.gemeentearchiefvlissingen.nl/home/tweede-wereldoorlog/herdenken/herdenken-in-de-gemeente-vlissingen.html.
[42] Andrew Rawson, Walcheren. Operation Infatuate (Barnsley, Pen & Sword Books, 2003).
[43] Due to the current in the gap, it was very difficult to get ashore on the landside of the dunes as originally foreseen by Simonds.
[44] Richard Brooks, Walcheren 1944. Storming Hitler’s island fortress (Oxford, Osprey Publishing, 2011) p. 57.
[45] The German heavy coastal batteries were located within larger compounds. For example W11 covered an area of approx. 800 meters long within which four casemates with 150mm guns were located, 78 meters from each other, along with air-defence guns, several bunkers with field artillery and other bunkers – the whole area being protected by barbed wire and trenches.
[46] The 10 (Interallied) Commando consisted of marines of different nationalities, such as Belgian, Dutch, French and Norwegian. It is an example of a multinationally composed unit ‘avant le lettre’.
[47] Mark Zuehlke, Terrible Victory. First Canadian Army and the Scheldt Estuary Campaign September 13-November 6 1944 (Vancouver, Douglas and McIntyre, 2007).
[48] W. Denis Whitaker and Shelag Whitaker, Tug of War. The Canadian victory that opened Antwerp (Toronto, Stoddart, 1984) p. 16.
[49] Van Gent and Sakkers, De Slag om de Schelde, p. 309. Figures relate to the period from October 6 to November 8.
[50] Van der Ham, Zeeland 1940-1945 – deel 2.
[51] Whitaker and Whitaker, Tug of War, p. 149.
[52] Van Gent and Sakkers (De Slag om de Schelde, p. 230-231) argue that W13 was not running out on ammunition. Allied artillery attacks from the Breskens area should have made it impossible to reach the ammunition bunkers in the dunes. Whatever the reason was, W13 could not longer fire at the beach heads.
[53] Between October 7 1944 and March 30 1945 a total of 3,709 V1 or V2 attacks on Antwerp were carried out. See: V-bommen op Antwerpen, www.ablhistoryforum.be/viewtopic.php?t=245.
[54] Van Gent and Sakkers, De Slag om de Schelde, p. 284.